In the Model window, use the Equation tab to specify the equation or initial value for a selected building block. The Equation tab is for assigning units to a building block and selecting options and parameters that affect the building block's equation. (See Getting Started Online for differences in online editing).
To view the Equation tab, click the ![]() at the bottom of the Properties panel. For more information about using the Properties panel, see Using the Properties panel.
at the bottom of the Properties panel. For more information about using the Properties panel, see Using the Properties panel.
The options available in this section depend on the type of building block you select. See Equation Tab as List for specific capabilities related to summing converters and placeholders.


Type – Use this option to select how the initial value is calculated for the conveyor: Continuous or Discrete.
If you select Continuous, the initial value for the conveyor is spread evenly over the length of the conveyor, and flows out of it in a steady stream. Unless the inflow is from a queue, this is selected by default.
If you select Discrete, the initial value is separated into "packages", so it flows out of the conveyor in separate chunks. The initial value is spread over the conveyor, but the packages are stacked in the last DT of each conveyor slat. If the conveyor's inflow is from a queue, Discrete is automatically selected and can't be changed.
Accept – Use this option to select how much you want the conveyor to accept from its upstream queue: Single batch or Multiple batches.
Accept applies only to inflows from queues. Any inflows from a cloud stock, oven, or conveyor will be treated as if Multiples batches is selected. If there are no inflows from queues, the Single batch option will be disabled.
If any of the conveyor's inflows come from a queue, you can select either option. If you select Single batch, the conveyor will take the next batch in one of the queues each DT, subject to the inflow limit and capacity constraint. Multiple batches will make the conveyor take as much as it can from all the queues, leaving the queues empty if there are no capacity constraints on the conveyor.
Note: The quantity the conveyor can accept is always subject to the values in the conveyor's Capacity and Inflow limit parameters.
Split batches - This option is only available if at least one of the conveyor's inflows is from a queue.

Select this check box to allow the conveyor take only a portion of the "next" item in the queue, if the conveyor has reached its Inflow Limit or Capacity. If this check box is not selected, the flow from the queue will be set to zero (0) if the flow exceeds the values in the Capacity or Inflow limit parameters. This can lead to queue blockage.

Accept – Use this option to select how much of the value you want the oven to accept from its inflows: Single batch or Multiple batches.
Accept applies only to inflows from queues. Any inflows from a cloud stock, oven, or conveyor will be treated as if Multiples batches is selected. If the inflow is not from a queue, the Single batch option will be disabled.
If the oven's inflow comes from a queue, you can select either option. If you select Single batch, the oven will take the next batch in the queue each DT, subject to the inflow limit and capacity constraint. Multiple batches will make the oven take as much as it can from the queue, potentially leaving the queue empty.
Note: The quantity the oven can accept is determined by its capacity, as specified in the Capacity parameter.
Tip: To represent a processor that takes only the "next" item from the upstream queue, select the Single batch option, select the DT builtin for the fill time, and specify a large capacity.
Split batches – This option is only available if the oven's inflows are all queues.

Select this check box to let the oven take a portion of the "next" batch in the queue, in order to fill itself to capacity. If this check box is not selected, the flow from the queue will be set to zero (0) whenever the flow exceeds the values in the oven's Capacity parameter. This can lead to queue blockage.
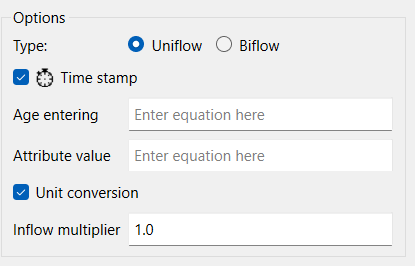
When you first view the Equation tab for a flow, the type of flow you chose when you first placed it will be selected. To change the type, select the appropriate option here.
Type (not available for flows into or out of conveyors or queues which are always uniflows).
Uniflow – Select this option to have the flow move in only one direction. With uniflows, the flow volume only takes on non-negative values. Biflows can take on any value.

Biflow – Select this option to have the flow move in two directions. With biflows, the flow volume can be any value (negative or positive). If you select this option, a second, dashed, arrowhead will appear on the flow to point in the direction of the negative flow. It's not possible to have a biflow connected to a conveyor, queue, or oven.

![]() Time Stamp – Select this option to time stamp the flow. This option is only available when the flow is connected to a conveyor, oven or queue or when selected Cycle-time as the integration method and the flow is into a non-negative stock. If you select this, flows will be marked with a clock and material from them will be stamped as coming into existence at the current time so that cycle time values can be computed downstream.
Time Stamp – Select this option to time stamp the flow. This option is only available when the flow is connected to a conveyor, oven or queue or when selected Cycle-time as the integration method and the flow is into a non-negative stock. If you select this, flows will be marked with a clock and material from them will be stamped as coming into existence at the current time so that cycle time values can be computed downstream.

Age entering – This box appears when the Time Stamp check box is selected. Enter an expression that represents the age of the material when it enters the stock. If you leave this blank the material is assumed to have an age of 0 when entering, an the cycle time measured on downstream outflows will be the time since entry.
Using a cycle time from an upstream process as the age entering allows you to compute cycle time for processes that are not just chained stocks.
Unit conversion – Select this check box to convert the units of measure for the flow as material moves through the flow pipe. This is useful when you're modeling processes like assembly (which transforms raw materials into finished goods) or chemical processes (which involve molecular transformations).
When you select the Unit conversion check box for a flow, a shaded half-circle will appear in the flow regulator on the diagram, to indicate that unit conversion is taking place.

The Unit conversion check box is only available for uniflow flows that connect two stocks (where the flow is conserved). The default is no unit conversion.
Inflow multiplier – This box appears when the Unit conversion check box is selected.
The inflow multiplier is the value the upstream stock's value should be multiplied by. The resulting value becomes the downstream stock's value.
The value can be either a number or a model variable from the Required Inputs list. The default value is 1.0.
To specify a value in this box, you can type a number, use the calculator buttons to enter a number, or click a variable name in the Required Inputs list.
When the model runs, the software reports the values for the flow before unit conversion has taken place.
Attribute Value – Use this to attach an attribute value to the flow. The value will be tracked through subsequent discrete stocks and their flows. The attribute will also be tracked through non-negative stocks with no biflows if the cycle-time integration method is selected. See Attribute and Cycle Time Tracking.
The Attribute Value field is only available on uniflows that connect to a conveyor, queue or oven (or that connect into a non-negative stock with no biflows if cycle-time is selected as the integration technique). Enter the equation for the attribute. The value of the equation at the time the flow occurs will be used to track material associated with the flow from that time.
To specify a value in this box, you can type a number, use the calculator buttons to enter a number, or click a variable name in the Required Inputs list. Leave blank to not specify any attribute value (the default).
Note You can use the attribute value to prioritize queue inflows (see Queue Computation). In this case the smaller the number the higher the priority (1st, 2nd and so on though you need not use whole numbers). Attribute values can also be used to control downstream queue outflows as noted below.
These options are in addition to those described for flow options.
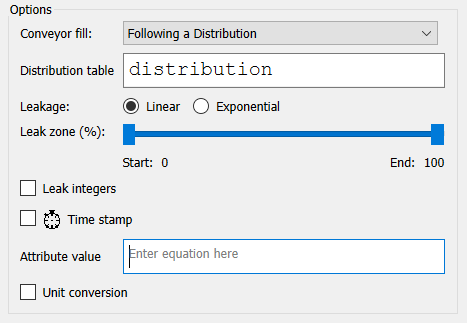
Conveyor fill determines how material will enter the conveyor. By default everything enters at the beginning, but you can also spread the input out - see Spreading Conveyor Inputs.
Leakage – This option is available if the flow is the second or subsequent outflow for a conveyor.
Select the type of leakage this flow represents: Linear or Exponential.
If you select the Linear option, the total amount that will leak for any given inflow will be the contribution of that inflow to the stock value (inflow*DT) multiplied by the leakage fraction. The leakage will be spread evenly in time over the leak zone. In steady state, the total leakage will be inflow*leak_fraction, and each slat in the leak zone will leak the total amount divided by the number of slats in the leak zone. In this case, the units of measure for the leakage fraction must be Dimensionless.
If you select the Exponential option, the amount that leaks from each slat within the leakage zone is equal to the slat contents times the leakage fraction, generating an exponential decay in the amount leaked across the leakage zone. In this case, the units of measure for the leakage fraction must be per time unit (e.g. Per Month, if the model is in Months).
For Linear leakage, the total amount leaked doesn't change with the length of the leakage zone, whereas for Exponential leakage, it does.
Note: To specify the leak fraction, use the Leak fraction box in the flow's Parameters section.
Select the Leak integers check box to round leakage flow to the nearest integer value. If DT is one that means the flow will be an integer. If DT is less than 1, it means the flow multiplied by DT will be an integer, so that the affected stocks only change by integer values.
The Leak zone is defined by the blue sliders. By default, the entire conveyor will be selected as the leak-prone section.
Use the sliders to specify the size of the leak zone. The leak zone is expressed as a percentage of the conveyor's transit time, which is applied to the inflow as it enters the conveyor.
To specify the leak zone, move the Start and End sliders to select the appropriate percentage. A leak zone percentage of 100 implies that the entire conveyor is leak-prone.
By default, the leak zone is 100%, and leakage occurs across the entire conveyor. To have the leakage occur at the end of the conveyor, move the start slider as far to the end as you can (99).
Tip: You can have multiple leakage flows from a conveyor; each leakage flow can have different leakage fractions, to create different leakage zones. For example, you can create a leakage flow of 10% for the first half of the conveyor and another leakage flow of 20% for the second half of the conveyor. Do this by adding additional flows and defining their leakage zones differently.
These options are in addition to those described for flow options.

Purge after age – is available if the flow is an outflow from a queue and is not connected to a conveyor or oven. See Queue Computation for details.
Enter the equation for the age after which material will be purged. To specify a value in this box, you can type a number, use the calculator buttons to enter a number, or click a variable name in the Required Inputs list. Leave this blank to not removed based on age (the default).
Restrict by Attribute – restricts queue outflows to only batches of material having the selected value. This option is only available on outflows from Queues.
Enter a comma (or semi-colon) separated set of integer values, dimension elements or dimension names. When using a dimension name, the variable must be arrayed by that dimension or an error will be flagged. Only batches that have attributes matching one of these values will be processed by the outflow. Leave this blank to not restrict the flow by attribute (the default).
Note If attribute values are not integers they will be rounded when making a comparison to the list of values specified.
Note If Restrict by Attribute is specified for a queue outflow, no other outflows will process batches with matching attributes unless you include the same value in another queue outflow. See Queue Computation for more discussion.
Overflow – This check box is available if the flow is the second or subsequent outflow for a queue.
Select this check box to make the flow an overflow. When a higher priority flow is blocked because of capacity constraints, the flow will be routed through the overflow. For more information see Queue Computation.
This displays a list of all inputs that must be used in the equation for the selected variable. Required inputs are anything connected to the selected variable using connectors. This list only appears if the selected variable is a flow or converter.
Note: This list doesn't appear for Summing Converters or stocks, which can take any inputs.
Tips: You can also see a list of all allowable inputs for the selected variable (including required inputs) by using the Find window. You can then drag a listed input from the Find window into the Equation box. You can also drag a required input variable from the model diagram into the Equation box. For more information, see Finding Variables in Models.
This displays a list of builtins that you can include in the equation for the selected building block.
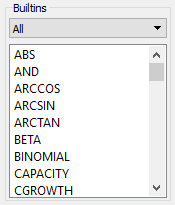
Note: Regarding converters, this list doesn't appear for summing converters, which create their equations automatically.
Tip: By default, the list displays all builtins in alphabetical order. To make it easier to find a specific builtin, select a category in the box at the top of the Builtins list.
This is the list of variables whose values will be added for the selected summing converter.
Note: This box only appears when a summing converter is selected on the model diagram.
Note: Inputs to summing converters must be in the same module that the summing converter is in. If you select a variable in a different module and drag it into the list nothing will happen. To bring in something from another module you will need to create a cross level ghost for it.
Use the buttons in the Operators and Calculator sections to insert numbers and operators into the equation for the building block.
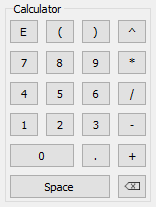

Note: The full calculator is only available when you're viewing the Equation tab for a stock, or when the Properties panel is sufficiently wide. For other variables, and when the Properties panel is at its default width, only the Operators section is available.
Tip: You can also insert operators and numbers into the equation by typing them.
Tips: To transpose arrays in an equation, you can use the apostrophe (') as a transposition operator. For example, to transpose the array A[X, Y] as A[Y, X] in an equation, you can type A'. The apostrophe operator doesn't appear as a button in the Operator section. You have to type it.
If you're defining an equation for an arrayed variable that has more than one dimension with the same name, use the @ operator instead of the dimension name to refer to a particular instance of the dimension. Use @1 for the first use of the dimension, @2 for the second use of the dimension, etc. See Specialized Array Manipulation.
The options available in this section depend on the type of building block you select. For most (such as capacity) you can leave the entry blank to leave that parameter inactive.
Tip: For parameters where you can specify a model variable or expression as a value, you can type the variable's name in the parameter box, or drag a variable from the Find window.

Transit time – Use this parameter to specify the time it takes for material to pass through the conveyor.
To specify a constant transit time, type a single number in this box. When you specify a constant transit time, all material that enters the conveyor will use the number you specify for the transit time.
To specify a variable transit time, define an equation in this box. For an equation, you can use other model variables, builtins, algebraic operators, or a graphical function.
FIFO –Check this to have the conveyor always maintain the order of its contents when the transit time changes.
If this is not checked the transit time when material enters the conveyor will determine when the material will leave the conveyor. SeeTraditional Conveyor Computation.
If this is checked the transit time will determine how quickly material will leave the conveyor based on the amounts of material added to the conveyor at previous times. See FIFO Conveyor Computation.
Note If the transit time does not change, checking the FIFO option will not change results, but may slow down the simulation.
Capacity – Use this parameter to limit the capacity of the conveyor. Inflows per unit of time won't be allowed to fill the conveyor to a greater capacity than the value you specify here. To allow an unlimited capacity for the conveyor, set the value to infinity by typingINF (or by pressing option-5 on a Mac).
Note: If the conveyor has multiple inflows and there's a Capacity limit set for the conveyor, the inflows are prioritized; multiple flows enter the conveyor in order of their priority. For more information about how flows are prioritized, see Flow prioritization.
This parameter isn't available if the conveyor's inflow is a conveyor or an oven, because, in that case, the flow rate is controlled by the upstream conveyor or oven.
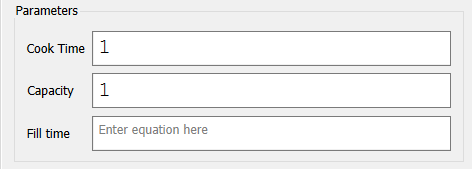
Cook time – Use this parameter to specify how long the oven "cooks" a batch before opening its door and releasing the contents. Material exits from the oven when the cook time expires.
You can specify a constant cook time or a variable cook time.
To specify a constant cook time, type a single number. When the oven closes its door, it'll use this number as the cook time for the batch.
To specify a variable cook time, use model variables, builtins, algebraic operators, or a graphical function. The cook time that's calculated as the oven closes its door will be used for the batch.
Note: If you're using one of the Random builtins to generate a variable cook time, be sure to generate random numbers within the oven's equation. Don't generate random numbers in an external converter and use that converter to define the oven time. If you generate random numbers externally, the sequence of cook times won't conform to the distribution you've specified for the converter.
Capacity – Use this parameter to specify how much material the oven can hold at once. When the capacity is reached or the fill time expires (whichever comes first), the oven will close its doors and begin "cooking" its contents.
To specify the oven's capacity, enter a value or an equation. For an equation, you can use required inputs, builtins, algebraic operators, or a graphical function.
Tips: To represent a capacity-constrained situation, select the One at a time option, specify a long fill time, and specify a small capacity.
To represent a processor that takes only the "next" item from the upstream queue, select the One at a time option, select the DT builtin for the fill time, and specify a large capacity.
Note If both Capacity and Fill Time are left blank the oven will never begin its cook cycle but just continue to take on new material.
Note Fill time does not start counting until something has been added to the oven (a nonzero inflow occurs).
Flow parameters are displayed only for conveyor leakages and queue outflows.

Leak fraction – This parameter is available if the flow is a leakage flow from a conveyor. The leak fraction is used to determine the leakage flow volume. Whatever enters the conveyor, multiplied by the leakage fraction, exits through the leakage flow.
Define a leakage fraction by using a constant, other model variables, builtins, algebraic operators, or a graphical function. The leakage fraction must be in the 0-1 range. Numbers outside this range will be forced to the nearest endpoint.
For Linear leakage flows, the total amount to leak is equal to the inflow times the DT times the leakage fraction, and this amount is distributed evenly across the leakage zone of the conveyer (each slat leaks the total amount divided by the number of slats). The total amount leaked doesn't change with the length of the leakage zone.
For Exponential leakage flows, the amount that leaks from each slat within the leakage zone is equal to the slat contents times the leakage fraction, generating an exponential decay in the amount leaked across the leakage zone. The total amount leaked changes with the length of the leakage zone.
To specify the type of leak (Linear or Exponential) and the leak zone for the flow, use the options in the flow's Options section.
Ignore losses from earlier leak zones, if checked, causes the leak fraction to refer to the amount originally entering the conveyor rather that the amount left in the conveyor at the beginning of the leak zone (after other leakages have already occurred). This option is only available if there are multiple leakages and at least one of them has a leak zone that starts later than the beginning (0). See Traditional Conveyor Computation for more discussion.
Leak same fraction for all durations, if checked, will make the leakage the specified fraction of the input regardless of how the input is spread when flowing into the conveyor. This option is only available if there are no leak zone, and at least one inflow is set to either spread values across the conveyor, or use a distribution. See Traditional Conveyor Computation for more discussion.
There are a number of optional parameter available for some variable types. These are contained in an expandable group in order to minimize clutter.

To view the optional parameters click on the triangle at the left. There are two optional parameters that are used by Conveyors, Queues, and Ovens as well as Non-negative Stocks when using the Cycle Time integration technique.

Init Attribute specifies the attribute value that will be used to initialize the stock. This can be an expression, or an arrayed variable with a single * dimension.
Init Cycle Time specifies the cycle time value that will be used to initialize the stock. This can be an expression, or an arrayed variable with a single * dimension.
These optional parameters, and their use, is described more completely in Initializing Discrete Stocks.
There are additional optional parameters for some variable types.
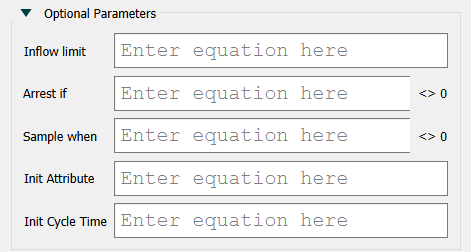
Inflow limit – Use this parameter to limit the inflow into the conveyor. Inflows per unit time won't be allowed to exceed the value you specify here. To allow an unlimited inflow limit for the conveyor, set the value to infinity by typing INF (or by pressing option-5 on a Mac).
This parameter isn't available if the conveyor's inflow is a conveyor or an oven, because, in that case, the flow rate is controlled by the upstream conveyor or oven.
Notes: If the Discrete option is selected for the conveyor, the entire inflow limit will flow during one DT.
If the conveyor has multiple inflows and there's an inflow limit set for the conveyor, the inflows are prioritized so that the multiple flows enter the conveyor in order of their priority. For more information about how flows are prioritized, see Flow prioritization.
Arrest – Use this parameter to have the converter stop whenever the equation you specify equals anything other than zero (0).
To use this parameter, select the Arrest check box and then type an equation in the box that appears.
Whenever the arrest equation is not equal to zero (0), the conveyor will stop. Inflows and outflows to the conveyor will be set to zero (0). The conveyor will start where it left off when the arrest equation is equal to zero (0).
Note: The Arrest option is disabled when an inflow to the conveyor comes from a conveyor or an oven.
Sample – Use this parameter to sample the conveyor's transit time whenever the equation you specify equals anything other than zero (0).
To use this parameter, select the Sample check box and then type an equation in the box that appears.
Whenever the sample equation isn't equal to zero (0), the current value of the transit time equation will be used for the transit time of material flowing onto the conveyor. If the sample equation is equal to zero (0), the transit time doesn't change. Material will exit the conveyor when the sampled transit time has expired.
If you don't select the Sample check box, units will be assigned to the transit time so that it's calculated as the units enter the conveyor.
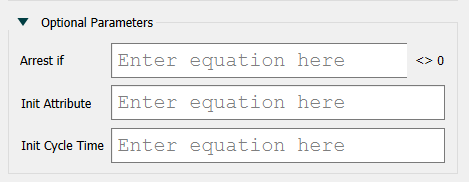
Arrest – Use this parameter to have the oven stop whenever the equation you specify equals anything other than zero (0).
To use this parameter, select the Arrest check box and then type an equation in the box that appears.
Whenever the arrest equation is not equal to zero (0), the oven will stop. Inflows and outflows to the oven will be set to zero (0). The oven will start where it left off when the arrest equation is equal to zero (0).
Queue optional parameters are displayed only for queues.
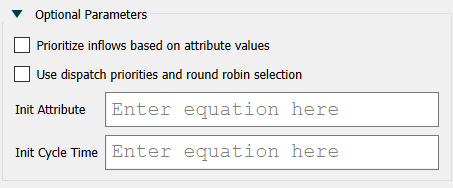
Prioritize inflows based on attribute values, if checked, will put higher priority inflows (those with lower attribute values) ahead in the queue so they exit sooner. See Queue Computation for more discussion.
Use dispatch priorities and round robin selection – Check this to have outflows from the queue rotate priority based on the last oven that was filled from the queue. If the ovens have the same characteristics (capacity, fill time and cook time) this will dispatch to each in turn. If this is not checked the first oven will always be given priority, and later ovens may not be used at all.
Oven priorities are determined by the order the flows were connected to the conveyor, or sequentially by array element if the oven has more dimensions than the queue.

Use dispatch priorities and round robin selection, if checked, will use the specified priority and use a round robin dispatch approach for outflows of the same priority.
Dispatch priority determines how to look for places to put the outflows from a queue. This has an effect only if there is more than one outflow and the checkbox is checked. In this case the smaller priority number outflows will be processed first. See Queue Computation for more discussion.
Note Checking Use dispatch priorities and round robin selection will change it for all outflows and for the upstream queue.
Use the Causes Uses button (![]() ) to navigate to causes and uses of the current variable. See Causes Uses.
) to navigate to causes and uses of the current variable. See Causes Uses.
Use this box to specify the initial value or equation for the selected building block. The initial value specified here is used only at the start of a simulation run.
Note If you right click on a name in the equation it will bring up a Context Menu that will allow you to navigate to variables and provide more information for functions and macros.
Note The name and icon for the selected building block appear just above the Equation box.
The method for defining the initial value and equation depends on the type of building block you select. The following general procedures apply to defining equations for all types of building blocks. For information on defining equations for a specific type of building block, click the appropriate link below.

Note: You can also generate initial and subsequent values for variables, via a link from an Excel or .CSV file, by using the data import features. For more information, see Importing and Exporting Data.
Type a constant or specify a variable or algebraic expression that evaluates to a single value.
The initial value can be either a number, a sequence of numbers separated by , (; if using , for decimal separators), or an expression involving variables. Use one of the following methods to define the initial value:
Type a single number in the Equation box. This value will be evenly spread over the length of the conveyor.
Type an expression involving other model variables.
Note: When the Discrete option is selected, the conveyor will be initialized so that the material flows out in discrete "packets". The initial value will not be portioned out over the entire conveyor, but stacked in the last DT of each conveyor slat.
Type a series of numbers, separated by commas; each number corresponds to a unit of time in the conveyor's Transit time. Any slats not initialized will default to the last value provided. The first number you type will be the first to exit from the conveyor.
Note: When the Discrete option is selected, the conveyor will be initialized so that the material flows out in discrete "packets" with all material stacked at the last DT of each slot. Otherwise, each initial value you provide will be spread over one time unit within the conveyor.
Type a single non-negative number that isn't greater than the oven's capacity.
Type a constant or define an algebraic expression that evaluates to a single value. All required inputs have to be used in the equation for the flow.
Type a constant or define an algebraic expression that evaluates to a single value. All required inputs have to be used in the equation for the converter.
By default, the active and initial equations for flows and converters are the same (stocks only have initial equations). To overcome initialization Troubleshooting Circularities, it can be convenient to specify different initial and active equations. To do this simply click on the small A at the top right of the equation area:

The A will change to an I->A (for initial going back to active) and display a relatively long note:
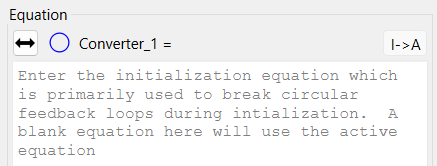
The initial equation is like the equation for a stock. There is no fixed set of inputs, though typically initial equations are simplified versions of the active equation. The initial equation is used only to set the initial values for stocks. Once all the stocks are initialized, while still at the initial time, the active equation for the variable will be used (see How model equations are solved). If the equation is blank, the active equation will be used during initialization.
When you add an initial equation, the button for the active equation will change to A->I (active going to initial) indicating there is an initial equation.

This check box appears if the selected variable has been defined as an arrayed variable.
To apply a single equation to all elements in the array, select this check box, and then use the Equation box to define the equation like you would for a non-arrayed variable.

To provide a separate equation for each element in the array, clear this check box. If you clear this check box, a table will appear in the Equation box where you can provide values or equations for each element of the array.
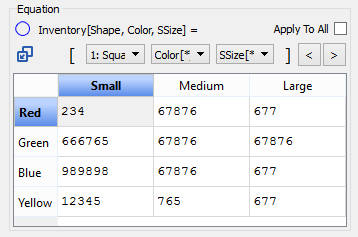
If the array has more than 2 dimensions the cells will represent a 2 dimensional slice of the array. You can change the slice by selecting a different element from the dropdowns ( ). Select "--All--" if it is available to apply the equation to all elements in the dimension. For more information about specifying equations for arrays, see Creating Arrayed Variables. You can also open the Arrayed Equation editing dialog by clicking on the
 ![]() button.
button.
Use the options in this section to assign and manage units of measure.
Note: You can't assign or change units for a variable whose units are defined by other variables. For example, the unit of measure for a flow attached to a stock is defined by the stock's unit of measure. In this case, the flow's units are displayed in the Units box, but you can't edit them directly; to change the flow's units, change the stock's units.
If you're enforcing unit consistency, when you click ![]() at the bottom of the tab to apply your changes, the software will perform a unit consistency check on the equation.
at the bottom of the tab to apply your changes, the software will perform a unit consistency check on the equation.
For more information, see Assigning Units to Variables, Creating and Deleting Units, and Checking Unit Consistency.