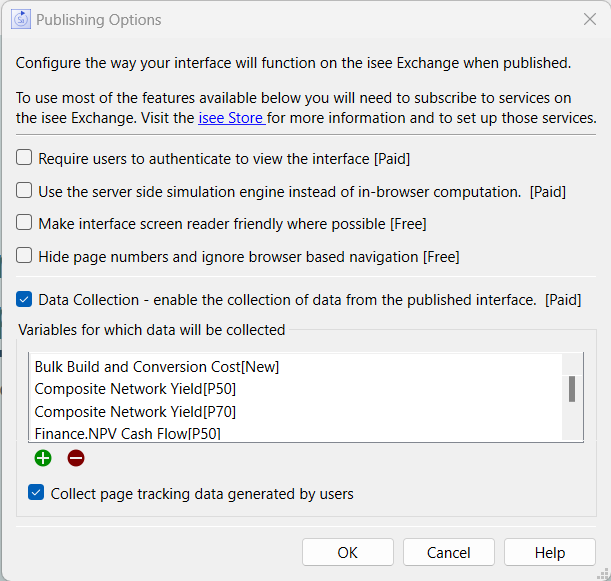
Use the publishing options dialog to specify how you want to publish your interface. Use of these options will require a corresponding subscription on the isee Exchange. If you don't have the subscription set up when you try to publish with one of these options selected, you'll get a dialog indicating that a subscription is necessary and publishing will fail. Conversely, if you have subscribed to one of these services, but publish a model without checking them, you will receive a warning message that the service is not being used.
The dialog is opened from the Interface Settings Properties Panel

Normally anyone can open and run a simulation. Check this to require anyone wanting to use the simulation to first log into the exchange. They'll be able to use the simulation only if they've been invited to do so. See Managing Groups on the isee Exchange for more discussion.
By default, when you publish your interface, users will run it in their browser. This has many advantages, including no latency or dependence on a continuing internet connection. It is, however, generally slower than running the model on the server, and also requires more time to load. In addition, models that use SMTHN, DELAYN, or DERIVN with a variable or expression for the order argument, will not work with the in-browser solution. Select this option to run the models on the server.
Use this to enable the accessibility options (tab order and alternative text) available for the each element of your interface. See Interface Accessibility for discussion.
Normally the URL for a published interface will display the page number you are currently on. This allows people to navigate to a specific page, and to use the browser back button to go to a previous page they had visited. Use this option to make the published interface act like a single web page. It will only be possible for the user to change pages using the navigation controls on the page. The back button will leave the interface altogether.
Data collection allows you to see, compare, and download the results of different runs from your interface. See Data Collection for more details.
This is a list of the variables in your model that will have data collected for them, allowing you to view the results. It automatically includes every variable you've specified an input object for (that is, all user decisions). Automatically included variables are shown in italic and can't be removed.
Use ![]() to add a variable to the list. The Find window will open to allow you to select a variable.
to add a variable to the list. The Find window will open to allow you to select a variable.
To remove an optional variable from the list, click on it, and click on ![]() . You will not be able to remove the names shown in italic.
. You will not be able to remove the names shown in italic.
In addition to the results for simulations, you can track the activities of users by looking at the pages they visit and the time spent there. Checking this will store this information for your review.
Note: Tracking data are not anonymized, though they may include anonymous users. It's your responsibility to comply with any laws or institutional guidelines related to data collection.
This option is only available for Multiplayer Games in which chat has been enabled in the Multiplayer Options dialog. It will keep a transcript of all chat messages (public and private) sent during the execution of a game. The log is available for review or download as described in Chat Log.
Click OK to accept your changes, or Cancel to ignore them. Any changes you make will take effect the next time you publish your model. You'll need to publish to a simulation that supports the features you select in this dialog. Visit the isee Store for more information on setting up these capabilities on the isee Exchange.