Use the commands on the File menu to perform high-level model tasks, like creating, opening, saving, printing, and closing models. You can also use commands on this menu for locking models and exiting from the application.
Each command on the File menu is briefly described below.
Use this command to create a new model file. A new window will open for the new model. Any model you currently have open (even a new one) will remain open as well.
Use this command to create a new causal loop diagram. The CLD Window will open and you can add and edit the CLD from there. Existing models and CLDs will remain open.
Use this command to open an existing model.
Note Stella Professional will open Stella and iThink Version 10 models. If you have a version 9 or earlier model, you'll need to first open it in Stella or iThink version 10.1, and then save it in the XMILE file format (.STMX or .ITMX) Stella uses.
Use this command to close the currently open model. If you've made changes to the model that haven't been saved yet, a message will appear asking if you want to save the model.
Use this command to save any changes you've made to the model, including run results, since the last time it was saved.
Note Stella models are saved with a file extension of .STMX or .ITMX. In addition to the model file, any results you have from running the model will be saved in a file with the same name and the extension .ISDB. If your model uses modules that are stored in separate files, these files (always .ITMX) will also be saved.
Use this command to save a copy of the currently open model with a new name. If your model uses modules stored in separate files, a new folder called modelname_Modules will be created, and the externally saved modules will be saved there.
Image Files (Model)
You can also save the current module diagram as an image file. Select the type you want to save as from the type dropdown in the file selection dialog, or simply add the extension to the file name (.pdf or .svg to save a vector format file and .jpg, .bmp, .gif or .png to save a raster format file). This can be helpful as an alternative to going through the clipboard.
Note Saving to an image file does not change the model's file name or save any model edits you have made.
Use this to create a zip file that contains the model and any supporting files including runs, import and export data, graphics, videos, sound. The file created will be a standard zip file that can be expanded and opened with both the model and all of the supporting resources. Any embedded graphics will be put into files to minimize size and prevent duplication. You can target stmz files, which will open directly in Stella, or zip files, which need to be expanded to be open in Stella as discussed in Stella File Formats. This is a very good way to archive models in different states of development with all their supporting files and also to package models up to send to other people.
Note The archive will include import and export files. If these files contain sensitive information you can remove them from the archive before sharing it. Models will run without import files, though they may not produce the same results.
Use this command to revert the currently open model to its state when it was last saved. You'll be prompted to discard changes, and any changes made since the model was last saved will be lost.
Use this command to open the Page Setup dialog box, in order to select printer and page setup options for the current model.
Note You can also set page orientation directly on the Model Properties panel.
Use this command to open the Print Preview dialog, which will let you choose page orientation, see how the pages will be laid out, and print.
Use this command to print the currently visible model. If you're working inside a module, the content of that module will be printed. If you are working on the interface, the pages listed in the Pages Panel (Interface) will be printed.
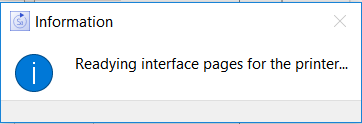
Note When printing from the interface, or opening a print preview, it will take a moment for the interface pages to be set up in a format suitable for printing sequentially. During this time an information dialog will be displayed.

Note When printing from the interface, the images will be rendered to the printer as a bitmap. For high resolution printers the quality of graphs and tables will not be as high as it is when printing from the model.
Use this command to select security preferences for your model. Security preferences let you restrict access to the model when you share it with other people. For more information, see Setting Model Security Preferences.
Use this command to exit the application. If you've made any changes to any open models since the last time that model was saved, you'll be asked if you want to save these changes before exiting.
Note To exit from the application in the Macintosh version, use the Quit Stella command on the Stella menu.