Table Styles Properties Panel
Use the Table Styles Properties panel to control the appearance of tables in the model.
To open Table Styles, switch to Edit mode and click on an empty space in the model. (If you've closed the Properties panel, you'll need to double-click, or slide it out with the  button appearing at the right of the application.) Then click on the
  tab at the bottom of the panel.

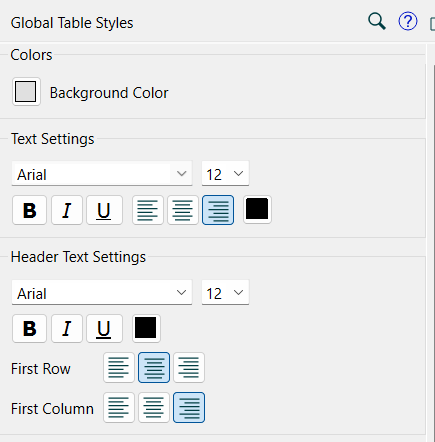
Colors
- Background Color - sets the background color that will be used in tables.
Text Settings
Use this to set the font size, face, and attributes for table values.
Header Text Settings
Use this to set the font size, face, and attributes for row and column labels.
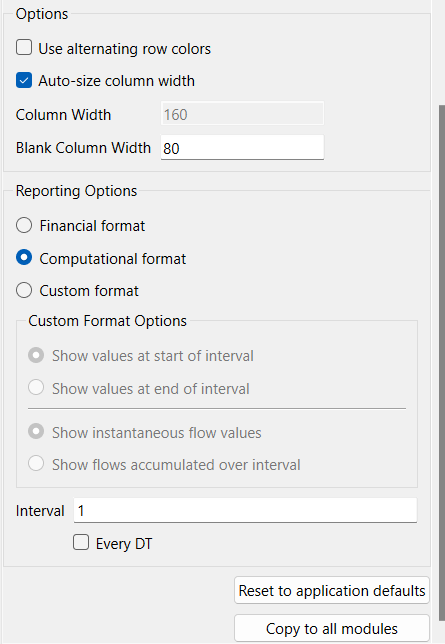
Options

- Use alternating row colors - select this box to have tables use alternating colors.
- Autosize column width - select this box to have the software set column widths so that all header and cell values are visible (variable column width). If this isn't checked, you can specify a uniform column width.
- Column width - the width of all columns containing values. Available only if Autosize column width is not checked.
- Blank column width - the width of all blank columns. Blank columns can be used to separate sets of values in a table.
Reporting Options
- Financial format accumulates flows and shows end of interval values.
- Computational format shows instantaneous flows and values at the start of the interval.
- Custom formatallows you more specificity:
- Show values at start/end of interval - choose whether to show a value at the start or the end of each interval.
- Show instantaneous/accumulated flow values - choose whether to show values as they change, or as the accumulated value over an interval.
- Interval/Every DT - enter an interval (the amount of time between displayed values), or select Every DT to show one row or column for each DT.
Note The Reporting Options settings on the root model determine the behavior of the Results Panel.
Reset to application defaults
Use this button to reset the values in the panel to the application defaults (as set using the Default Settings dialog).
Copy to all modules
If you have a model with multiple modules you can set the values for all modules by clicking on this button. Otherwise the changes will apply only to the module you are currently working in.
![]() button appearing at the right of the application.) Then click on the
button appearing at the right of the application.) Then click on the ![]() tab at the bottom of the panel.
tab at the bottom of the panel.
